
템플릿 매칭
Template Matching -> 객체 탐지
매치되는 것을 찾을때까지 전체를 본다. 템플릿 매칭은 상관관계에 기초된다.
import cv2
import numpy as np
import matplotlib.pyplot as plt
%matplotlib inline

full = cv2.imread('../DATA/sammy.jpg')
full = cv2.cvtColor(full, cv2.COLOR_BGR2RGB)

plt.imshow(full)
데이터를 불러오고, 색이 제대로 나올 수 있게 RGB컬러로 변환하는 과정을 거친다.
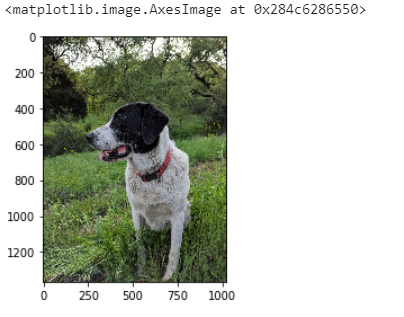
full.shape1367 * 1025 * 3
사진의 shape은 세로 1367 * 가로 1025* 3컬러가 나옴
템플릿 이미지로 강아지 얼굴 사진의 일부를 따온다
face= cv2.imread('../DATA/sammy_face.jpg')
face = cv2.cvtColor(face, cv2.COLOR_BGR2RGB)

plt.imshow(face)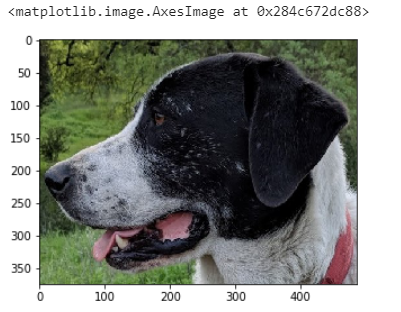
face.shape375*486*3
강아지 얼굴인 템플릿 이미지의 한 부분을 선택해서 픽셀 대 픽셀 이미지를 매칭되는 이미지를 찾을때까지 스캔한다
methods = eval('cv2.TM_CCOEFF')

for m in methods:

    # Create a copy of the image
    full_copy = full.copy() #이미지 복사본

    # Get the actual function instead of the string
    method = eval(m) #문자열 methods를 반복하여 문자열 평가

    # Apply template Matching with the method
    res = cv2.matchTemplate(full_copy,face,method) #템플릿을 메소드와 매칭시키기
#강아지 전체사진, 강아지, 메소드ccoeff 는 히트맵이 나타나는데 실제 매치가 일어나는곳에 높은 상관관계를 보이는 값이 표현되는 함수이다.
가장 노란색이 가장 높은 최대값은 매치를 찾았다고 믿음
# The Full Image to Search
full = cv2.imread('../DATA/sammy.jpg')
full = cv2.cvtColor(full, cv2.COLOR_BGR2RGB)


# The Template to Match
face= cv2.imread('../DATA/sammy_face.jpg')
face = cv2.cvtColor(face, cv2.COLOR_BGR2RGB)


# All the 6 methods for comparison in a list
# Note how we are using strings, later on we'll use the eval() function to convert to function
methods = ['cv2.TM_CCOEFF', 'cv2.TM_CCOEFF_NORMED', 'cv2.TM_CCORR','cv2.TM_CCORR_NORMED', 'cv2.TM_SQDIFF', 'cv2.TM_SQDIFF_NORMED']메소드에 다른 방법들도 list에 넣어서 어떻게 템플릿 매칭을 하는지 본다.
for m in methods:

    # Create a copy of the image
    full_copy = full.copy() #이미지 복사본

    # Get the actual function instead of the string
    method = eval(m) #문자열 methods를 반복하여 문자열 평가

    # Apply template Matching with the method
    res = cv2.matchTemplate(full_copy,face,method) #템플릿을 메소드와 매칭시키기
    #강아지 전체사진, 강아지, 메소드

    # Grab the Max and Min values, plus their locations
    min_val, max_val, min_loc, max_loc = cv2.minMaxLoc(res) #튜플 언패킹, 히트맵에서 값을 스캔하여 최소값과 최대값 위치를 찾음

    # Set up drawing of Rectangle

    # If the method is TM_SQDIFF or TM_SQDIFF_NORMED, take minimum
    # Notice the coloring on the last 2 left hand side images.
    if method in [cv2.TM_SQDIFF, cv2.TM_SQDIFF_NORMED]:
        top_left = min_loc #(x,y)   매칭되는 최소값을 사용해야함
    else:
        top_left = max_loc #히트맵에 squarediff 작동(square가 있어서 음수여도 양수로 나옴

    # Assign the Bottom Right of the rectangle 직사각형 실제 불러옴
    bottom_right = (top_left[0] + width, top_left[1] + height)

    # Draw the Red Rectangle 직사각형 실제 불러옴
    cv2.rectangle(full_copy,top_left, bottom_right, (255,0,0), 10)

    # Plot the Images 1행 2열의 플롯을 불러오기, 좌우 서로 붙어 있는 이미지 가져오기
    plt.subplot(121)
    plt.imshow(res)
    plt.title('Result of Template Matching')

    plt.subplot(122)
    plt.imshow(full_copy)
    plt.title('Detected Point')
    plt.suptitle(m)


    plt.show() #이거 입력하지 않으면 서브플롯이 계속 겹쳐나옴
    print('\n')
print('\n')결과를 내기위해 한 셀에 나타냄
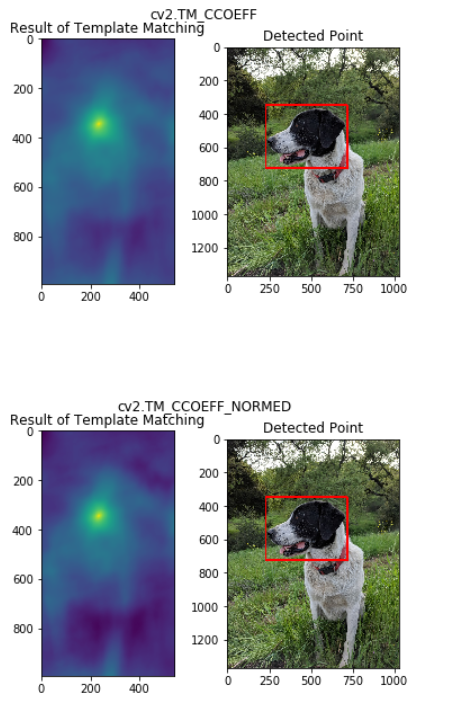
좌측 상단에서 매칭을 찾았다.
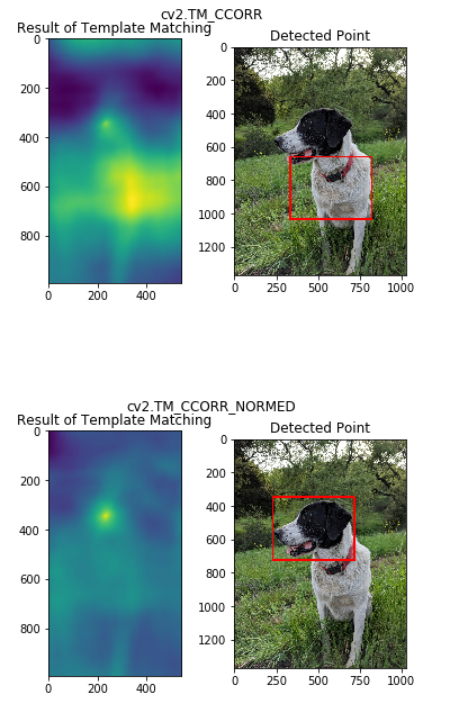
ccorr 매칭은 올바른 템플릿을 검출하지 못했다.
eval 함수
sum([1,2,3])6
mystring = 'sum'
myfunc = eval(mystring)
myfunc([1,2,3])6
string을 작동 가능하게 만들어서 mystring이 sum기능을 하게 만든다. 문자열을 평가하여 opencv 기능으로 전환한다.
출처: udemy X KMOOC OpenCV 및 딥러닝을 이용한 Computer Vision 파이썬
'Deep Learning > Computer Vision' 카테고리의 다른 글
| 엣지 검출 (0) | 2023.08.09 |
|---|---|
| 코너 검출 (0) | 2023.08.08 |
| 파이썬 카메라에 도형 그리기 (0) | 2023.07.23 |
| 파이썬으로 카메라 연결하기 (2) | 2023.07.23 |
| Histograms with OpenCV (1) | 2023.07.16 |