
1. 파이썬 카메라에 직사각형 그리기
일단 모두 하나의 셀로 실행해야 할 것을 염두에 둘것
import cv2

cap = cv2.VideoCapture(0)

width = int(cap.get(cv2.CAP_PROP_FRAME_WIDTH)) #에러 피하기 위함 int 프레임 혹 정수로
height = int(cap.get(cv2.CAP_PROP_FRAME_HEIGHT))


# 직사각형 만들기
#top left corner
x = width//2 #정수가 되기 위함 소수점 안나오게 하는 정수값
y = height//2

# Width and height
w = width//4
h = height//4

#bottom right x+w, y+h

while True:
    # 프레임 캡쳐
    ret, frame = cap.read()

    #직사각형 그리기

    cv2.rectangle(frame, (x, y), (x+w, y+h), color=(0,0,255),thickness= 4)

    # 프레임 보여주기
    cv2.imshow('frame', frame)

    #직사각형을 먼저 드로잉하고 프레임을 불러와야함

   # This command let's us quit with the "q" button on a keyboard.
    # Simply pressing X on the window won't work!
    if cv2.waitKey(1) & 0xFF == ord('q'): #q 누르면 나가기
        break

# When everything is done, release the capture
cap.release()
cv2.destroyAllWindows()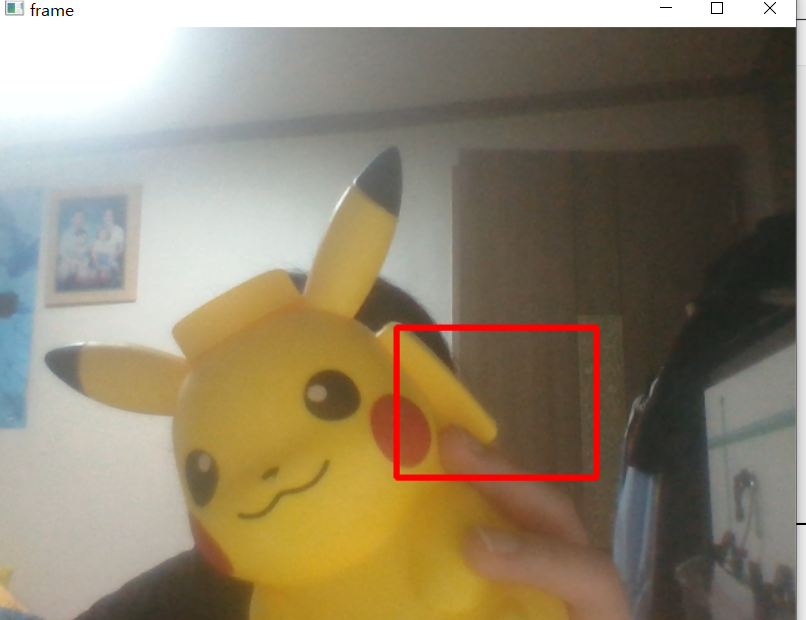
이렇게 웹캠에 고정된 사각형이 나타남
2. 카메라에 실시간으로 사각형 그리기
import cv2
import numpy as np
# 왼쪽 상단 버튼을 누르면 사각형이 나오게함

# 콜백 함수 정의
def draw_rectangle(event,x,y,flags,param):

    global pt1,pt2,topLeft_clicked,botRight_clicked

    if event == cv2.EVENT_LBUTTONDOWN:

        # reset the rectangle(직사각형 리셋명령, 직사각형이 존재하는지 확인함)

        if topLeft_clicked == True and botRight_clicked == True:
            topLeft_clicked = False
            botRight_clicked = False
            pt1 = (0,0)
            pt2 = (0,0)

        #좌측상단클릭이 되면 pt1 정의 pt1 기반 원 그림

        if topLeft_clicked == False:
            pt1 = (x,y)
            topLeft_clicked = True


        #만약 좌측상단은 클릭했지만, 우측 하단은 클릭하지 않았다면
        #topleft_clicked와 연결되어 작동함
        elif botRight_clicked == False:
            pt2 = (x,y)
            botRight_clicked = True

#위의 두가정이 모두 사실이면 좌측상단과 우측 하단 모두 클릭해 실행  topLeft_clicked and botRight_clicked
# 아직 아무것도 그리지 않음
#global 변수 정의
pt1 = (0,0) #0,0에서 시작하는 사각형의 첫번째 포인트, 좌측상단
pt2 = (0,0) #0,0에서 시작하는 사각형의 두번째 포인트, 우측하단
topLeft_clicked = False #좌측 상단이 되려는 지점을 클릭했는지,
botRight_clicked = False #우측 하단이 되려는 지점을 클릭했는지 여부를 보여줌

#콜백과 연결
cap = cv2.VideoCapture(0)

# 윈도우와 연결
cv2.namedWindow('Test')

# Bind draw_rectangle function to mouse cliks
cv2.setMouseCallback('Test', draw_rectangle)


#콜백 -> 직사각형 그리기,
#전역 변수 정의 , 전역변수 기초 프레임에 드로잉
#콜백과 연결
while True:
    # Capture frame-by-frame
    ret, frame = cap.read()

    if topLeft_clicked: #포인트 1의 중심, 반지름 5, red값 두께 -1
        cv2.circle(frame, center=pt1, radius=5, color=(0,0,255), thickness=-1)

    #drawing rectangle 동시에 같이 클릭하면 직사각형 드로잉
    if topLeft_clicked and botRight_clicked:
        cv2.rectangle(frame, pt1, pt2, (0, 0, 255), 3)


    # 프레임 보여주기
    cv2.imshow('Test', frame)

    # q로 나오기
    if cv2.waitKey(1) & 0xFF == ord('q'):
        break

# When everything is done, release the capture
cap.release()
cv2.destroyAllWindows()실행을 하면 처음에는 이렇게 점이 찍히고

왼쪽 상단을 기준으로 직사각형이 만들어진다

출처: udemy x KMOOC OpenCV 및 딥러닝을 이용한 Computer Vision 파이썬
'Deep Learning > Computer Vision' 카테고리의 다른 글
| 코너 검출 (0) | 2023.08.08 |
|---|---|
| 템플릿 매칭 (0) | 2023.08.08 |
| 파이썬으로 카메라 연결하기 (2) | 2023.07.23 |
| Histograms with OpenCV (1) | 2023.07.16 |
| Gradients (0) | 2023.07.16 |