Attention is all you need (NeurIPS, 2017) code review
https://www.youtube.com/watch?v=AA621UofTUA&t=2706s
동빈나 님의 [딥러닝 기계 번역] Transformer: Attention Is All You Need (꼼꼼한 딥러닝 논문 리뷰와 코드 실습)
을 보고 코드를 리뷰해봤다. 설명을 너무 잘해주신다 갓갓,,, 복받으십쇼
동빈나님의 깃허브를 많이 참고했지만 중간중간 라이브러리 문제때문에 코드 수정을 추가로 진행했다.
pytorch에서 제공하는 텍스트 분류 라이브러리 torchtext를 install 해준다
!pip install torchtext==0.6.0
preprocessing
spacy 라이브러리를 이용해서 영어와 독일어의 전처리 모듈을 설치한다
%%capture
!python -m spacy download en
!python -m spacy download de
import spacy
import os
spacy_en = spacy.load('en_core_web_sm') # 영어 토큰화(tokenization)
spacy_de = spacy.load('de_core_news_sm') # 독일어 토큰화(tokenization)spacy의 버전마다 load 뒷부분이 다른것 같은데 spacy = 2.xx 버전에서는 en, de 이렇게만 쓰는것 같다.
# 간단히 토큰화(tokenization) 기능 써보기
tokenized = spacy_en.tokenizer("I am a graduate student.")

for i, token in enumerate(tokenized):
    print(f"인덱스 {i}: {token.text}")
문장을 단어 별로 토큰화 한다.
인덱스 0: I
인덱스 1: am
인덱스 2: a
인덱스 3: graduate
인덱스 4: student
인덱스 5: .
영어와 독일어의 토큰화 함수를 정의한다.
# 독일어(Deutsch) 문장을 토큰화 하는 함수 (순서를 뒤집지 않음)
def tokenize_de(text):
    return [token.text for token in spacy_de.tokenizer(text)]


# 영어(English) 문장을 토큰화 하는 함수
def tokenize_en(text):
    return [token.text for token in spacy_en.tokenizer(text)]
영어와 독일어 모두 문장이 들어왔을 때 토큰화를 수행한 결과를 리스트로 담는다.
필드(field) 라이브러리를 이용해 데이터셋에 대한 구체적인 전처리 내용을 명시한다. BucketIterator는 torchtext 라이브러리의 일부로, 효과적인 배치 처리를 위한 도구이다. 문장의 길이가 큰 차이가 나지 않는 것들끼리 묶어서 배치를 만들어 패딩을 최소화 하게 하는 역할을 한다.
seq2seq 모델과 다르게 batch_first를 True로 설정한다.
여기서 SRC는 독일어 TRG는 영어이다.
from torchtext.data import Field, BucketIterator

SRC = Field(tokenize=tokenize_de, init_token="<sos>", eos_token="<eos>", lower=True, batch_first=True)
TRG = Field(tokenize=tokenize_en, init_token="<sos>", eos_token="<eos>", lower=True, batch_first=True)
문장앞부분에는 sos, 뒷부분은 eos, 모두 소문자. 시퀀스보다는 batch가 먼저 오도록 한다.
데이터셋 불러오기
filenotfounderror: [errno 2] no such file or directory: '.data/multi30k/train.de' 에러 해결법
스택오버플로우에도 해당 에러 해결법이 없어서 애먹었다.
download해주고 unpack 해주는 함수를 정의했고, data라는 경로 설정도 다시 해주었다. 데이터셋 링크를 수동으로 가져와서 풀어주었다.
import os
import gzip
import shutil
import requests

def download_and_unpack(url, dirname, filename):
    response = requests.get(url, stream=True)
    with open(filename, 'wb') as out_file:
        shutil.copyfileobj(response.raw, out_file)

    with gzip.open(filename, 'rb') as f_in:
        with open(os.path.join(dirname, filename[:-3]), 'wb') as f_out:
            shutil.copyfileobj(f_in, f_out)
    os.remove(filename)

# Create the necessary directories
if not os.path.exists('.data'):
    os.makedirs('.data')

if not os.path.exists('.data/multi30k'):
    os.makedirs('.data/multi30k')

# URLs for the dataset
urls = [
    "https://raw.githubusercontent.com/multi30k/dataset/master/data/task1/raw/train.de.gz",
    "https://raw.githubusercontent.com/multi30k/dataset/master/data/task1/raw/train.en.gz",
    "https://raw.githubusercontent.com/multi30k/dataset/master/data/task1/raw/val.de.gz",
    "https://raw.githubusercontent.com/multi30k/dataset/master/data/task1/raw/val.en.gz",
    "https://raw.githubusercontent.com/multi30k/dataset/master/data/task1/raw/test_2016_flickr.de.gz",
    "https://raw.githubusercontent.com/multi30k/dataset/master/data/task1/raw/test_2016_flickr.en.gz",
]

# Download and unpack each file
for url in urls:
    filename = url.split("/")[-1]
    download_and_unpack(url, '.data/multi30k', filename)
위의 코드만으로 했을 때도 계속 에러가 나서 아래 코드도 추가해주었더니 이제서야 에러가 해결되었다.
# Download and unpack the test dataset file
url = "https://raw.githubusercontent.com/multi30k/dataset/master/data/task1/raw/test_2016_flickr.en.gz"
filename = url.split("/")[-1]
download_and_unpack(url, '.data/multi30k', filename)

# Rename the file
os.rename('.data/multi30k/test_2016_flickr.en', '.data/multi30k/test2016.en')


# Download and unpack the test dataset file
url = "https://raw.githubusercontent.com/multi30k/dataset/master/data/task1/raw/test_2016_flickr.de.gz"
filename = url.split("/")[-1]
download_and_unpack(url, '.data/multi30k', filename)

# Rename the file
os.rename('.data/multi30k/test_2016_flickr.de', '.data/multi30k/test2016.de')
이런식으로 파일이 나와야함
from torchtext.datasets import Multi30k #데이터 초기화

train_dataset, valid_dataset, test_dataset = Multi30k.splits(exts=(".de", ".en"), fields=(SRC, TRG), root='.data')
끝에 root='.data'를 추가해서 내가 지정한 경로에서 제대로 불러올 수 있도록 했다
print(f"학습 데이터셋(training dataset) 크기: {len(train_dataset.examples)}개")
print(f"평가 데이터셋(validation dataset) 크기: {len(valid_dataset.examples)}개")
print(f"테스트 데이터셋(testing dataset) 크기: {len(test_dataset.examples)}개")
학습 데이터셋(training dataset) 크기: 29000개
평가 데이터셋(validation dataset) 크기: 1014개
테스트 데이터셋(testing dataset) 크기: 1000개
제대로 dataset이 불러와졌다.
# 학습 데이터 중 하나를 선택해 출력
print(vars(train_dataset.examples[30])['src']) #인덱스 30번에 해당하는 문장 출력
print(vars(train_dataset.examples[30])['trg'])
['ein', 'mann', ',', 'der', 'mit', 'einer', 'tasse', 'kaffee', 'an', 'einem', 'urinal', 'steht', '.']
['a', 'man', 'standing', 'at', 'a', 'urinal', 'with', 'a', 'coffee', 'cup', '.']
train 데이터의 인덱스번호 30번(실제 31번) 에 해당하는 독일어, 영어 문장을 각각 출력해주었다.
vars는 object.__dict__와 동일한 결과를 반환한다. 객체가 가지고 있는 속성들과 그에 해당하는 값을 보게 한다.
field의 build_vocab을 이용하여 영어와 독어의 단어 사전을 생성하는데, 최소 두번이상 나온 단어들만 선택한다.
SRC.build_vocab(train_dataset, min_freq=2)
TRG.build_vocab(train_dataset, min_freq=2)

print(f"len(SRC): {len(SRC.vocab)}") #독일어는 7855개단어
print(f"len(TRG): {len(TRG.vocab)}") #영어는 5893개 단어
len(SRC): 7853
len(TRG): 5893
각각의 초기 input dimension을 구할 수 있다. 최소 두번이상 등장하는 단어 추출한다.
print(TRG.vocab.stoi["abcabc"]) # 없는 단어: 0 #stoi string to i
print(TRG.vocab.stoi[TRG.pad_token]) # 패딩(padding,의미가 없는 공간): 1
print(TRG.vocab.stoi["<sos>"]) # <sos>: 2
print(TRG.vocab.stoi["<eos>"]) # <eos>: 3
print(TRG.vocab.stoi["hello"]) #단어의 인덱스
print(TRG.vocab.stoi["world"])
0 아무것도 없는 단어
1 패딩
2 sos(시작부분)
3 eos(끝나는 부분)
4112
1752
한 문장에 포함된 단어가 순서대로 나열된 상태로 네트워크에 입력되어야 하는데, 이를 BucketIterator를 이용하여 하나의 배치에 포함된 문장들이 가지는 단어의 개수가 유사하도록 만들도록 한다. 하나의 배치에 포함되어 있는 문장의 sequence length가 가능한 유사하도록 만들어 길이가 짧은 문장들에 대해서 패딩 토큰이 최대한 적게 들어갈수있도록함. 실제로 입력으로 들어가는 데이터의 차원을 줄일 수 있음
배치크기는 = 128로 설정한다.
import torch

device = torch.device('cuda' if torch.cuda.is_available() else 'cpu')#cuda 사용 여부

BATCH_SIZE = 128

# 일반적인 데이터 로더(data loader)의 iterator와 유사하게 사용 가능
train_iterator, valid_iterator, test_iterator = BucketIterator.splits(
    (train_dataset, valid_dataset, test_dataset),
    batch_size=BATCH_SIZE,
    device=device)
for i, batch in enumerate(train_iterator):
src = batch.src
trg = batch.trg
print(f"첫 번째 배치 크기: {src.shape}")
# 현재 배치에 있는 하나의 문장에 포함된 정보 출력
for i in range(src.shape[1]):
print(f"인덱스 {i}: {src[0][i].item()}") # 여기에서는 [Seq_num, Seq_len], 첫번째 문장에 있는 각각의 단어
# 첫 번째 배치만 확인
break
가장긴 문장의 시퀀스 길이가 35이다. 첫번째 문장에 있는 각 정보들을 확인해봤다. 인덱스1-14까지는 각각의 단어의 정보를 나타냈다. 인덱스 16부터는 의미가 없는 패딩토큰이 들어가 있다. 인덱스 3이 eos, 시작부분2 sos이다.
Multi- attention model architecture
어텐션은 쿼리(query), 키(key), 값(value) 의 세가지 요소가 있다. 현재 쿼리, 키, 값의 차원이 모두 동일하다.
하이퍼 파라미터는 hidden_dim(하나의 단어에 대한 임베딩 차원), n_heads:(헤드(head)의 개수 = scaled dot-product attention의 개수), dropout_ratio:(드롭아웃(dropout) 비율) 로 이루어져 있다.
import torch.nn as nn

class MultiHeadAttentionLayer(nn.Module):
    def __init__(self, hidden_dim, n_heads, dropout_ratio, device): #파라미터 설정
        super().__init__()

        assert hidden_dim % n_heads == 0 #입력 차원이 어텐션 헤드의 개수로 나누어 떨어지는지 확인(concat 되기 때문)

        self.hidden_dim = hidden_dim # 임베딩 차원
        self.n_heads = n_heads # 헤드(head)의 개수: 서로 다른 어텐션(attention) 컨셉의 수
        self.head_dim = hidden_dim // n_heads # 각 헤드(head)에서의 임베딩 차원, 결과 dim을 h개로 쪼갬

        self.fc_q = nn.Linear(hidden_dim, hidden_dim) # Query 값에 적용될 FC 레이어, 입력을 hidden_dim 차원으로 변환
        self.fc_k = nn.Linear(hidden_dim, hidden_dim) # Key 값에 적용될 FC 레이어
        self.fc_v = nn.Linear(hidden_dim, hidden_dim) # Value 값에 적용될 FC 레이어

        self.fc_o = nn.Linear(hidden_dim, hidden_dim) #모든 어텐션 헤드의 결과를 결합

        self.dropout = nn.Dropout(dropout_ratio) #드롭아웃비율 설정

        self.scale = torch.sqrt(torch.FloatTensor([self.head_dim])).to(device) #각 헤드의 차원 수의 제곱근 값, 점수가 너무 커지는 것을 방지하여 학습의 안정성을 높임
def forward(self, query, key, value, mask = None): #순전파 쿼리, 키, 값, 마스크를 받아
batch_size = query.shape[0] #쿼리= 단어의 갯수 가져오기
# query: [batch_size, query_len, hidden_dim] query length는 단어의 갯수
# key: [batch_size, key_len, hidden_dim]
# value: [batch_size, value_len, hidden_dim]
Q = self.fc_q(query) #선형변환 적용
K = self.fc_k(key)
V = self.fc_v(value)
# Q: [batch_size, query_len, hidden_dim]
# K: [batch_size, key_len, hidden_dim]
# V: [batch_size, value_len, hidden_dim]
# hidden_dim → n_heads X head_dim 형태로 변형 -> concat시 dmodel = dv x h
# n_heads(h)개의 서로 다른 어텐션(attention) 컨셉을 학습하도록 유도
Q = Q.view(batch_size, -1, self.n_heads, self.head_dim).permute(0, 2, 1, 3) #h만큼 차원을 가지도록함
K = K.view(batch_size, -1, self.n_heads, self.head_dim).permute(0, 2, 1, 3)
V = V.view(batch_size, -1, self.n_heads, self.head_dim).permute(0, 2, 1, 3)
# Q: [batch_size, n_heads, query_len, head_dim]
# K: [batch_size, n_heads, key_len, head_dim]
# V: [batch_size, n_heads, value_len, head_dim]
# Attention Energy 계산 : 스케일링 팩터로 나눈 후 쿼리와 키의 내적을 계산하여 어텐션 에너지를 계산
energy = torch.matmul(Q, K.permute(0, 1, 3, 2)) / self.scale #K.permute는 K.transpose 되기위함
# energy: [batch_size, n_heads, query_len, key_len]
# 마스크(mask)를 사용하는 경우
if mask is not None:
# 마스크(mask) 값이 0인 부분을 -1e10으로 채우기
energy = energy.masked_fill(mask==0, -1e10) #마이너스무한 -> softmax 넣었을때 거의 0이 되도록
# 어텐션(attention) 스코어 계산: 각 단어에 대한 확률 값
attention = torch.softmax(energy, dim=-1)
# attention: [batch_size, n_heads, query_len, key_len]
# 여기에서 Scaled Dot-Product Attention을 계산
x = torch.matmul(self.dropout(attention), V) #value 값 구하기
# x: [batch_size, n_heads, query_len, head_dim]
x = x.permute(0, 2, 1, 3).contiguous() #텐서 차원 재정렬
# x: [batch_size, query_len, n_heads, head_dim]
x = x.view(batch_size, -1, self.hidden_dim) #n_heads * head_dim 형태로 재구조화
# x: [batch_size, query_len, hidden_dim]
x = self.fc_o(x) #각 어텐션 헤드의 결과를 결합
# x: [batch_size, query_len, hidden_dim]
return x, attentionview 함수는 Tensor의 크기를 변경해주는데, -1은 해당 차원의 크기를 자동으로 추론해준다.
예를 들어, Q.view(batch_size, -1, self.n_heads, self.head_dim) 코드는 Q 텐서를 [batch_size, _, n_heads, head_dim] 형태로 변경한다. 여기서 _는 자동으로 계산되는 차원이다
permute 함수는 Tensor의 차원을 재배열한다. 예를 들어 Q.permute(0, 2, 1, 3) 코드는 Q의 두 번째와 세 번째 차원을 서로 바꾼다. [batch_size, _, n_heads, head_dim] 형태의 텐서가 [batch_size, n_heads, _, head_dim] 형태로 변경된다.
contiguous함수는 메모리 상에서 텐서의 복사본을 만들어 연속된 메모리를 가지도록 한다.
Position-wise Feedforward architecture
입력과 출력의 차원이 동일하다.
하이퍼 파라미터는 hidden_dim(하나의 단어에 대한 임베딩 차원), pf_dim( Feedforward 레이어에서의 내부 임베딩 차원), dropout_ratio(드롭아웃(dropout) 비율)
Position-wise Feed-forward 네트워크는 Transformer 모델의 각 위치에 독립적으로 적용되는 네트워크로, 각 위치의 정보를 개별적으로 처리한다.
class PositionwiseFeedforwardLayer(nn.Module):
    def __init__(self, hidden_dim, pf_dim, dropout_ratio):
        super().__init__()

        self.fc_1 = nn.Linear(hidden_dim, pf_dim) #hidden dimension 그대로 내보냄, 입력 차원을 hidden_dim에서 pf_dim으로 변환
        self.fc_2 = nn.Linear(pf_dim, hidden_dim) #fc_2는 pf_dim을 다시 hidden_dim으로 되돌림

        self.dropout = nn.Dropout(dropout_ratio)

    def forward(self, x):

        # x: [batch_size, seq_len, hidden_dim]
        x = self.dropout(torch.relu(self.fc_1(x))) #활성화함수 후 드롭아웃

        # x: [batch_size, seq_len, pf_dim]
        x = self.fc_2(x)

        # x: [batch_size, seq_len, hidden_dim]

        return x
Encoder archiecture
하나의 encoder layer에 대해 정의하였다.
입력과 출력의 차원이 같은 것을 기반으로 해서 트랜스포머의 인코더는 인코더 레이어를 여러 번 중첩해 사용한다.
하이퍼 파라미터로는 hidden_dim:하나의 단어에 대한 임베딩 차원 ,n_heads: 헤드(head)의 개수 = scaled dot-product attention의 개수, pf_dim: Feedforward 레이어에서의 내부 임베딩 차원, dropout_ratio: 드롭아웃(dropout) 비율
로 이루어져 있다.
<pad> 토큰에 대하여 마스크(mask) 값을 0으로 설정한다.
class EncoderLayer(nn.Module):
    def __init__(self, hidden_dim, n_heads, pf_dim, dropout_ratio, device):
        super().__init__()

        self.self_attn_layer_norm = nn.LayerNorm(hidden_dim) #attention layer norm
        self.ff_layer_norm = nn.LayerNorm(hidden_dim) #feedforward layer norm
        self.self_attention = MultiHeadAttentionLayer(hidden_dim, n_heads, dropout_ratio, device)
        self.positionwise_feedforward = PositionwiseFeedforwardLayer(hidden_dim, pf_dim, dropout_ratio)
        self.dropout = nn.Dropout(dropout_ratio)

    # 하나의 임베딩이 복제되어 Query, Key, Value로 입력되는 방식
    def forward(self, src, src_mask): #입력시퀀스 ,마스크

        # src: [batch_size, src_len, hidden_dim]
        # src_mask: [batch_size, src_len]

        # self attention
        # 필요한 경우 마스크(mask) 행렬을 이용하여 어텐션(attention)할 단어를 조절 가능
        _src, _ = self.self_attention(src, src, src, src_mask) #query key value로 복제 , 같은값 나옫도록 , 마스크 넣기

        # dropout, residual connection and layer norm
        src = self.self_attn_layer_norm(src + self.dropout(_src)) # 드롭아웃을 거친 후 원래의 src에 더해짐(잔차 연결)

        # src: [batch_size, src_len, hidden_dim]

        # position-wise feedforward
        _src = self.positionwise_feedforward(src)

        # dropout, residual and layer norm
        src = self.ff_layer_norm(src + self.dropout(_src)) #residual connection

        # src: [batch_size, src_len, hidden_dim]

        return src
전체 Encoder architecture
위는 하나의 레이어에 대해 정의했지만 이번 단계에서는 전체 인코더 아키텍처를 정의한다.
하이퍼 파라미터
- input_dim: 하나의 단어에 대한 원 핫 인코딩 차원
- hidden_dim: 하나의 단어에 대한 임베딩 차원
- n_layers: 내부적으로 사용할 인코더 레이어의 개수
- n_heads: 헤드(head)의 개수 = scaled dot-product attention의 개수
- pf_dim: Feedforward 레이어에서의 내부 임베딩 차원
- dropout_ratio: 드롭아웃(dropout) 비율
- max_length: 문장 내 최대 단어 개수
논문에서는 postional encoding을 ,sin, cos를 이용했지만 여기서는 positinal embedding을 학습하는 형태로 구현한다(BERT 에서 사용하는 방식). <pad> 토큰에 대하여 마스크(mask) 값을 0으로 설정한다.
class Encoder(nn.Module):
    def __init__(self, input_dim, hidden_dim, n_layers, n_heads, pf_dim, dropout_ratio, device, max_length=100):
        super().__init__()

        self.device = device
        #사인 코사인을 찐으로 사용하기 보다는 이미정해져있는 파라미터를 이용해 위치 임베딩
        self.tok_embedding = nn.Embedding(input_dim, hidden_dim) #input을 embedding 차원으로 바꿔줌, 인코더 레이어를 n_layers만큼 쌓아서 생성
        self.pos_embedding = nn.Embedding(max_length, hidden_dim) #위치 정보를 벡터 형태로 변환

        self.layers = nn.ModuleList([EncoderLayer(hidden_dim, n_heads, pf_dim, dropout_ratio, device) for _ in range(n_layers)])
        #인코더 레이어를 n_layers만큼 쌓아서 생성

        self.dropout = nn.Dropout(dropout_ratio)

        self.scale = torch.sqrt(torch.FloatTensor([hidden_dim])).to(device) #제곱근의 dim 값

    def forward(self, src, src_mask):

        # src: [batch_size, src_len]
        # src_mask: [batch_size, src_len]

        batch_size = src.shape[0] #가장단어갯수가 많은 문장의 단어갯수가 배치사이
        src_len = src.shape[1]

        pos = torch.arange(0, src_len).unsqueeze(0).repeat(batch_size, 1).to(self.device)


        # pos: [batch_size, src_len]

        # 소스 문장의 임베딩과 위치 임베딩을 더한 것을 사용
        src = self.dropout((self.tok_embedding(src) * self.scale) + self.pos_embedding(pos)) #위치 정보가 포함된 값을 더함

        # src: [batch_size, src_len, hidden_dim]

        # 모든 인코더 레이어를 차례대로 거치면서 순전파(forward) 수행
        for layer in self.layers:
            src = layer(src, src_mask) #순전파

        # src: [batch_size, src_len, hidden_dim]

        return src # 마지막 레이어의 출력을 반환
pos = torch.arange(0, src_len).unsqueeze(0).repeat(batch_size, 1).to(self.device)
이부분을 좀더 풀어서 해석하자면 0부터 문장이 가장긴 문장에 해당하는 번호까지 들어갈 수 있도록 만든다. 이렇게 생성된 텐서는 각 단어의 위치 정보를 나타낸다. unsqueeze(0)은 새로운 차원을 추가하여 텐서의 형태를 [1, src_len]으로 바꾼다. repeat(batch_size, 1)은 텐서를 batch_size만큼 반복하여 [batch_size, src_len] 형태의 텐서를 만든다. 즉, 모든 문장에 대해 동일한 위치 정보를 가지는 텐서를 생성한다.
Decoder architecture
하나의 디코더 레이어에 대해 정의한다. encoder와 마찬가지로 입력과 출력의 차원이 같고, decoder layer 를 여러번 중첩하여 사용한다. 두개의 multi-head attention layer를 사용한다.
하이퍼 파라미터는 hidden_dim(하나의 단어 임베딩 차원), n_heads( 헤드(head)의 개수 = scaled dot-product attention의 개수), pf_dim( Feedforward 레이어에서의 내부 임베딩 차원), dropout_ratio( 드롭아웃(dropout) 비율)
<pad> 토큰에 대하여 마스크(mask) 값을 0으로 설정한다. 타겟문장에서 각 단어에서는 다음단어가 무엇인지 알 수 없도록 마스크를 사용한다.
class DecoderLayer(nn.Module):
    def __init__(self, hidden_dim, n_heads, pf_dim, dropout_ratio, device):
        super().__init__()
        #초기
        self.self_attn_layer_norm = nn.LayerNorm(hidden_dim) #attention norm
        self.enc_attn_layer_norm = nn.LayerNorm(hidden_dim) #2번째 multi head attention norm
        self.ff_layer_norm = nn.LayerNorm(hidden_dim) #feedforward layer norm
        self.self_attention = MultiHeadAttentionLayer(hidden_dim, n_heads, dropout_ratio, device) #multihead attention
        self.encoder_attention = MultiHeadAttentionLayer(hidden_dim, n_heads, dropout_ratio, device) #encoder 출력값에서 들어온 multi head attention
        self.positionwise_feedforward = PositionwiseFeedforwardLayer(hidden_dim, pf_dim, dropout_ratio) #feedforward
        self.dropout = nn.Dropout(dropout_ratio)

    # 인코더의 출력 값(enc_src)을 어텐션(attention)하는 구조
    def forward(self, trg, enc_src, trg_mask, src_mask):

        # trg: [batch_size, trg_len, hidden_dim]
        # enc_src: [batch_size, src_len, hidden_dim]
        # trg_mask: [batch_size, trg_len]
        # src_mask: [batch_size, src_len]

        # self attention
        # 자기 자신에 대하여 어텐션(attention)
        _trg, _ = self.self_attention(trg, trg, trg, trg_mask) #쿼리, 키 value 모두 자기 자신을 넣을 수 있도록 'trg_mask'-> 미래의 단어에 대한 정보를 차단

        # dropout, residual connection and layer norm
        trg = self.self_attn_layer_norm(trg + self.dropout(_trg)) #드롭아웃+ 잔차 연결

        # trg: [batch_size, trg_len, hidden_dim]

        # encoder attention
        # 디코더의 쿼리(Query)를 이용해 인코더를 어텐션(attention)
        _trg, attention = self.encoder_attention(trg, enc_src, enc_src, src_mask) #encoder의 가장 마지막 출력값을 key로

        # dropout, residual connection and layer norm
        trg = self.enc_attn_layer_norm(trg + self.dropout(_trg))

        # trg: [batch_size, trg_len, hidden_dim]

        # positionwise feedforward
        _trg = self.positionwise_feedforward(trg)

        # dropout, residual and layer norm
        trg = self.ff_layer_norm(trg + self.dropout(_trg))

        # trg: [batch_size, trg_len, hidden_dim]
        # attention: [batch_size, n_heads, trg_len, src_len]

        return trg, attention
전체 decoder architecture
encoder의 전체 아키텍처와 똑같이 positional encoding을 positional embedding 학습하는 형태로 구현된다.
하이퍼 파라미터
- output_dim: 하나의 단어에 대한 원 핫 인코딩 차원
- hidden_dim: 하나의 단어에 대한 임베딩 차원
- n_layers: 내부적으로 사용할 인코더 레이어의 개수
- n_heads: 헤드(head)의 개수 = scaled dot-product attention의 개수
- pf_dim: Feedforward 레이어에서의 내부 임베딩 차원
- dropout_ratio: 드롭아웃(dropout) 비율
- max_length: 문장 내 최대 단어 개수
class Decoder(nn.Module):
    def __init__(self, output_dim, hidden_dim, n_layers, n_heads, pf_dim, dropout_ratio, device, max_length=100):
        super().__init__()

        self.device = device

        self.tok_embedding = nn.Embedding(output_dim, hidden_dim) #입력 토큰 임베딩 차원으로 변환
        self.pos_embedding = nn.Embedding(max_length, hidden_dim) #토큰 위치 임베딩

        self.layers = nn.ModuleList([DecoderLayer(hidden_dim, n_heads, pf_dim, dropout_ratio, device) for _ in range(n_layers)]) #decoder layer는 반복하여 중첩하여 사용 가능

        self.fc_out = nn.Linear(hidden_dim, output_dim) #fully connected layer

        self.dropout = nn.Dropout(dropout_ratio)

        self.scale = torch.sqrt(torch.FloatTensor([hidden_dim])).to(device)

    def forward(self, trg, enc_src, trg_mask, src_mask):

        # trg: [batch_size, trg_len]
        # enc_src: [batch_size, src_len, hidden_dim]
        # trg_mask: [batch_size, trg_len]
        # src_mask: [batch_size, src_len]

        batch_size = trg.shape[0] #배치크기
        trg_len = trg.shape[1] #타겟 길이

        pos = torch.arange(0, trg_len).unsqueeze(0).repeat(batch_size, 1).to(self.device)

        # pos: [batch_size, trg_len]

        trg = self.dropout((self.tok_embedding(trg) * self.scale) + self.pos_embedding(pos))

        # trg: [batch_size, trg_len, hidden_dim]

        for layer in self.layers:
            # 소스 마스크와 타겟 마스크 모두 사용
            trg, attention = layer(trg, enc_src, trg_mask, src_mask) #출력과 어텐션을 반환

        # trg: [batch_size, trg_len, hidden_dim]
        # attention: [batch_size, n_heads, trg_len, src_len]

        output = self.fc_out(trg)

        # output: [batch_size, trg_len, output_dim]

        return output, attention
transformer architecture
최종적인 전체 transformer를 정의한다.
class Transformer(nn.Module):
    def __init__(self, encoder, decoder, src_pad_idx, trg_pad_idx, device):
        super().__init__()

        self.encoder = encoder
        self.decoder = decoder
        self.src_pad_idx = src_pad_idx
        self.trg_pad_idx = trg_pad_idx
        self.device = device

    # 소스 문장의 <pad> 토큰에 대하여 마스크(mask) 값을 0으로 설정
    #패딩 토큰이 아닌 위치는 True, 패딩 토큰인 위치는 False
    def make_src_mask(self, src): # 패딩 토큰에 대한 마스크 만들기

        # src: [batch_size, src_len]

        src_mask = (src != self.src_pad_idx).unsqueeze(1).unsqueeze(2)
        # 문장의 인덱스가 패딩 토큰이면 False, 아니면 True, 1번째와 2번째 위치에 차원을 추가

        # src_mask: [batch_size, 1, 1, src_len]

        return src_mask

    # 타겟 문장에서 각 단어는 다음 단어가 무엇인지 알 수 없도록(이전 단어만 보도록) 만들기 위해 마스크를 사용
    def make_trg_mask(self, trg):

        # trg: [batch_size, trg_len]

        """ (마스크 예시)
        1 0 0 0 0
        1 1 0 0 0
        1 1 1 0 0
        1 1 1 0 0
        1 1 1 0 0
        """
        trg_pad_mask = (trg != self.trg_pad_idx).unsqueeze(1).unsqueeze(2)

        # trg_pad_mask: [batch_size, 1, 1, trg_len]

        trg_len = trg.shape[1]

        """ (마스크 예시)
        1 0 0 0 0
        1 1 0 0 0
        1 1 1 0 0
        1 1 1 1 0
        1 1 1 1 1
        """
        trg_sub_mask = torch.tril(torch.ones((trg_len, trg_len), device = self.device)).bool()

        # trg_sub_mask: [trg_len, trg_len]

        trg_mask = trg_pad_mask & trg_sub_mask #element wise 위에서 만든 두 마스크 결합

        # trg_mask: [batch_size, 1, trg_len, trg_len]

        return trg_mask

    def forward(self, src, trg):

        # src: [batch_size, src_len]
        # trg: [batch_size, trg_len]

        src_mask = self.make_src_mask(src)
        trg_mask = self.make_trg_mask(trg)

        # src_mask: [batch_size, 1, 1, src_len]
        # trg_mask: [batch_size, 1, trg_len, trg_len]

        enc_src = self.encoder(src, src_mask) #인코더 출력값

        # enc_src: [batch_size, src_len, hidden_dim]

        output, attention = self.decoder(trg, enc_src, trg_mask, src_mask)

        # output: [batch_size, trg_len, output_dim]
        # attention: [batch_size, n_heads, trg_len, src_len]

        return output, attention
torch.tril(torch.ones((trg_len, trg_len), device = self.device)).bool() 를 해석해보자면, 각 단어가 그 이후의 단어를 '보지 못하게' 하는 마스크를 만든다. torch.tril 함수는 주어진 텐서의 아래 삼각형(lower triangle)을 반환하고 그 위는 0으로 만든다.
모든 원소가 1인 [타겟 문장 길이, 타겟 문장 길이] 크기의 텐서를 만든 후, 이 텐서의 아래 삼각형을 추출하여 마스크를 만들고, 아래 삼각형을 추출하여 마스크를 만든다. 결과적으로 대각선 아래에는 True(1), 대각선 위에는 False(0)이 위치한다.
예를들어 3*3 텐서를 tril 함수에 넣으면,
x = tensor([[1, 2, 3],
        [4, 5, 6],
        [7, 8, 9]])

y = torch.tril(x)
print(y)
이처럼 아래 삼각형만 남고 위는 0으로 대체가 된다. 현재 위치보다 미래 위치의 정보를 참조하지 않도록 하게 한다.
tensor([[1, 0, 0],
        [4, 5, 0],
        [7, 8, 9]])
training
하이퍼 파라미터를 설정해준다. 구글 코랩으로 실행했기 때문에 비교적 적게 파라미터를 설정하였다.
INPUT_DIM = len(SRC.vocab)
OUTPUT_DIM = len(TRG.vocab)
HIDDEN_DIM = 256
ENC_LAYERS = 3 #논문에 있는 파라미터에 비하면 매우 작음
DEC_LAYERS = 3
ENC_HEADS = 8
DEC_HEADS = 8
ENC_PF_DIM = 512
DEC_PF_DIM = 512
ENC_DROPOUT = 0.1
DEC_DROPOUT = 0.1
SRC_PAD_IDX = SRC.vocab.stoi[SRC.pad_token]
TRG_PAD_IDX = TRG.vocab.stoi[TRG.pad_token]
# 인코더(encoder)와 디코더(decoder) 객체 선언
enc = Encoder(INPUT_DIM, HIDDEN_DIM, ENC_LAYERS, ENC_HEADS, ENC_PF_DIM, ENC_DROPOUT, device)
dec = Decoder(OUTPUT_DIM, HIDDEN_DIM, DEC_LAYERS, DEC_HEADS, DEC_PF_DIM, DEC_DROPOUT, device)
# Transformer 객체 선언
model = Transformer(enc, dec, SRC_PAD_IDX, TRG_PAD_IDX, device).to(device)
파라미터 count
def count_parameters(model):
    return sum(p.numel() for p in model.parameters() if p.requires_grad)

print(f'The model has {count_parameters(model):,} trainable parameters')
The model has 9,038,341 trainable parameters
모델 가중치 파라미터 초기화
def initialize_weights(m):
    if hasattr(m, 'weight') and m.weight.dim() > 1:
        nn.init.xavier_uniform_(m.weight.data)

model.apply(initialize_weights)
학습 및 평가 함수 정의
기본 seq2seq 모델과 유사하게 작성한다.
import torch.optim as optim

# Adam optimizer로 학습 최적화
LEARNING_RATE = 0.0005
optimizer = torch.optim.Adam(model.parameters(), lr=LEARNING_RATE)

# 뒷 부분의 패딩(padding)에 대해서는 값 무시
criterion = nn.CrossEntropyLoss(ignore_index = TRG_PAD_IDX)
# 모델 학습(train) 함수
def train(model, iterator, optimizer, criterion, clip):
model.train() # 학습 모드
epoch_loss = 0
# 전체 학습 데이터를 확인하며
for i, batch in enumerate(iterator): #각 배치 데이터 반복
src = batch.src #소스문장
trg = batch.trg #타겟문장
optimizer.zero_grad() #이전 배치에서 계산한 기울기 초기화
# 출력 단어의 마지막 인덱스(<eos>)는 제외
# 입력을 할 때는 <sos>부터 시작하도록 처리
output, _ = model(src, trg[:,:-1]) #마지막 토큰을 제외한 부분을 입력으로 하여, 출력을 계산
# output: [배치 크기, trg_len - 1, output_dim]
# trg: [배치 크기, trg_len]
output_dim = output.shape[-1]
output = output.contiguous().view(-1, output_dim) #출력과 타겟 문장을 손실 함수에 전달할 수 있는 형태로 변형
# 출력 단어의 인덱스 0(<sos>)은 제외
trg = trg[:,1:].contiguous().view(-1)
# output: [배치 크기 * trg_len - 1, output_dim]
# trg: [배치 크기 * trg len - 1]
# 모델의 출력 결과와 타겟 문장을 비교하여 손실 계산
loss = criterion(output, trg)
loss.backward() # 기울기(gradient) 계산
# 기울기(gradient) clipping 진행
torch.nn.utils.clip_grad_norm_(model.parameters(), clip) #기울기 클리핑을 수행하여, 기울기 폭발을 방지
# 파라미터 업데이트
optimizer.step()
# 전체 손실 값 계산
epoch_loss += loss.item()
return epoch_loss / len(iterator)#평균 손실을 반환학습(training) 및 검증(validation) 진행
에폭은 10으로 설정한다.
import math
import time

def epoch_time(start_time, end_time):
    elapsed_time = end_time - start_time
    elapsed_mins = int(elapsed_time / 60)#분
    elapsed_secs = int(elapsed_time - (elapsed_mins * 60)) # 초 단위의 경과 시간
    return elapsed_mins, elapsed_secs
import time
import math
import random
N_EPOCHS = 10
CLIP = 1
best_valid_loss = float('inf')
for epoch in range(N_EPOCHS):
start_time = time.time() # 시작 시간 기록
train_loss = train(model, train_iterator, optimizer, criterion, CLIP) #학습 데이터셋에 대해 모델을 학습하고, 평균 학습 손실을 계산
valid_loss = evaluate(model, valid_iterator, criterion) #valid dataset training
end_time = time.time() # 종료 시간 기록
epoch_mins, epoch_secs = epoch_time(start_time, end_time)
if valid_loss < best_valid_loss: #valid loss가 감소하는 경우에만 모델 파라미터를 새로운 파일로 기록
best_valid_loss = valid_loss
torch.save(model.state_dict(), 'transformer_german_to_english.pt')
print(f'Epoch: {epoch + 1:02} | Time: {epoch_mins}m {epoch_secs}s')
print(f'\tTrain Loss: {train_loss:.3f} | Train PPL: {math.exp(train_loss):.3f}')
print(f'\tValidation Loss: {valid_loss:.3f} | Validation PPL: {math.exp(valid_loss):.3f}')
if valid_loss < best_valid_loss 에 대해 설명하자면, 이번 에폭의 검증 손실이 이전의 최고 검증 손실보다 낮으면, 이번 에폭에서의 모델 파라미터를 파일로 저장한다. 이렇게 하면, 가장 성능이 좋았던 모델 파라미터를 나중에 불러와 사용할 수 있다.
model test
# 번역(translation) 함수
def translate_sentence(sentence, src_field, trg_field, model, device, max_len=50, logging=True):
    model.eval() # 평가 모드

    if isinstance(sentence, str):#입력이 문자열이면 토큰화
        nlp = spacy.load('de')
        tokens = [token.text.lower() for token in nlp(sentence)] #토큰화 진행
    else:
        tokens = [token.lower() for token in sentence]

    # 처음에 <sos> 토큰, 마지막에 <eos> 토큰 붙이기
    tokens = [src_field.init_token] + tokens + [src_field.eos_token]
    if logging:
        print(f"전체 소스 토큰: {tokens}")

    src_indexes = [src_field.vocab.stoi[token] for token in tokens] # 각 토큰을 해당하는 인덱스로 변환
    if logging:
        print(f"소스 문장 인덱스: {src_indexes}")

    src_tensor = torch.LongTensor(src_indexes).unsqueeze(0).to(device)#재까지의 출력 문장을 텐서로 변환

    # 소스 문장에 따른 마스크 생성
    src_mask = model.make_src_mask(src_tensor)

    # 인코더(endocer)에 소스 문장을 넣어 출력 값 구하기
    with torch.no_grad():
        enc_src = model.encoder(src_tensor, src_mask)

    # 처음에는 <sos> 토큰 하나만 가지고 있도록 하기
    trg_indexes = [trg_field.vocab.stoi[trg_field.init_token]]

    for i in range(max_len):
        trg_tensor = torch.LongTensor(trg_indexes).unsqueeze(0).to(device)

        # 출력 문장에 따른 마스크 생성
        trg_mask = model.make_trg_mask(trg_tensor)

        with torch.no_grad(): #디코더를 이용해 다음 단어를 예측
            output, attention = model.decoder(trg_tensor, enc_src, trg_mask, src_mask)

        # 출력 문장에서 가장 마지막 단어만 사용
        pred_token = output.argmax(2)[:,-1].item()
        trg_indexes.append(pred_token) # 출력 문장에 더하기

        # <eos>를 만나는 순간 끝
        if pred_token == trg_field.vocab.stoi[trg_field.eos_token]:
            break

    # 각 출력 단어 인덱스를 실제 단어로 변환
    trg_tokens = [trg_field.vocab.itos[i] for i in trg_indexes]

    # 첫 번째 <sos>는 제외하고 출력 문장 반환
    return trg_tokens[1:], attention
example_idx = 10 #10번째 데이터 확인
src = vars(test_dataset.examples[example_idx])['src'] #소스문장
trg = vars(test_dataset.examples[example_idx])['trg'] #타겟문장
print(f'소스 문장: {src}')
print(f'타겟 문장: {trg}')
translation, attention = translate_sentence(src, SRC, TRG, model, device, logging=True)
print("모델 출력 결과:", " ".join(translation))
attention 시각화
import matplotlib.pyplot as plt
import matplotlib.ticker as ticker

def display_attention(sentence, translation, attention, n_heads=8, n_rows=4, n_cols=2):

    assert n_rows * n_cols == n_heads

    # 출력할 그림 크기 조절
    fig = plt.figure(figsize=(15, 25))

    for i in range(n_heads):
        ax = fig.add_subplot(n_rows, n_cols, i + 1)

        # 어텐션(Attention) 스코어 확률 값을 이용해 그리기
        _attention = attention.squeeze(0)[i].cpu().detach().numpy()

        cax = ax.matshow(_attention, cmap='bone')

        ax.tick_params(labelsize=12)
        ax.set_xticklabels([''] + ['<sos>'] + [t.lower() for t in sentence] + ['<eos>'], rotation=45)
        ax.set_yticklabels([''] + translation)

        ax.xaxis.set_major_locator(ticker.MultipleLocator(1))
        ax.yaxis.set_major_locator(ticker.MultipleLocator(1))

    plt.show()
    plt.close()
example_idx = 10
src = vars(test_dataset.examples[example_idx])['src']
trg = vars(test_dataset.examples[example_idx])['trg']
print(f'소스 문장: {src}')
print(f'타겟 문장: {trg}')
translation, attention = translate_sentence(src, SRC, TRG, model, device, logging=True)
print("모델 출력 결과:", " ".join(translation))
display_attention(src, translation, attention)
Bleu score 계산
rom torchtext.data.metrics import bleu_score

def show_bleu(data, src_field, trg_field, model, device, max_len=50):
    trgs = []
    pred_trgs = []
    index = 0

    for datum in data:
        src = vars(datum)['src']
        trg = vars(datum)['trg']

        pred_trg, _ = translate_sentence(src, src_field, trg_field, model, device, max_len, logging=False)

        # 마지막 <eos> 토큰 제거
        pred_trg = pred_trg[:-1]

        pred_trgs.append(pred_trg)
        trgs.append([trg])

        index += 1
        if (index + 1) % 100 == 0:
            print(f"[{index + 1}/{len(data)}]")
            print(f"예측: {pred_trg}") #정답과 예측이 일대일로 매
            print(f"정답: {trg}")

    bleu = bleu_score(pred_trgs, trgs, max_n=4, weights=[0.25, 0.25, 0.25, 0.25])
    print(f'Total BLEU Score = {bleu*100:.2f}')

    individual_bleu1_score = bleu_score(pred_trgs, trgs, max_n=4, weights=[1, 0, 0, 0])
    individual_bleu2_score = bleu_score(pred_trgs, trgs, max_n=4, weights=[0, 1, 0, 0])
    individual_bleu3_score = bleu_score(pred_trgs, trgs, max_n=4, weights=[0, 0, 1, 0])
    individual_bleu4_score = bleu_score(pred_trgs, trgs, max_n=4, weights=[0, 0, 0, 1])

    print(f'Individual BLEU1 score = {individual_bleu1_score*100:.2f}')
    print(f'Individual BLEU2 score = {individual_bleu2_score*100:.2f}')
    print(f'Individual BLEU3 score = {individual_bleu3_score*100:.2f}')
    print(f'Individual BLEU4 score = {individual_bleu4_score*100:.2f}')

    cumulative_bleu1_score = bleu_score(pred_trgs, trgs, max_n=4, weights=[1, 0, 0, 0])
    cumulative_bleu2_score = bleu_score(pred_trgs, trgs, max_n=4, weights=[1/2, 1/2, 0, 0])
    cumulative_bleu3_score = bleu_score(pred_trgs, trgs, max_n=4, weights=[1/3, 1/3, 1/3, 0])
    cumulative_bleu4_score = bleu_score(pred_trgs, trgs, max_n=4, weights=[1/4, 1/4, 1/4, 1/4])

    print(f'Cumulative BLEU1 score = {cumulative_bleu1_score*100:.2f}')
    print(f'Cumulative BLEU2 score = {cumulative_bleu2_score*100:.2f}')
    print(f'Cumulative BLEU3 score = {cumulative_bleu3_score*100:.2f}')
    print(f'Cumulative BLEU4 score = {cumulative_bleu4_score*100:.2f}')
show_bleu(test_dataset, SRC, TRG, model, device)
----------------------------------------------
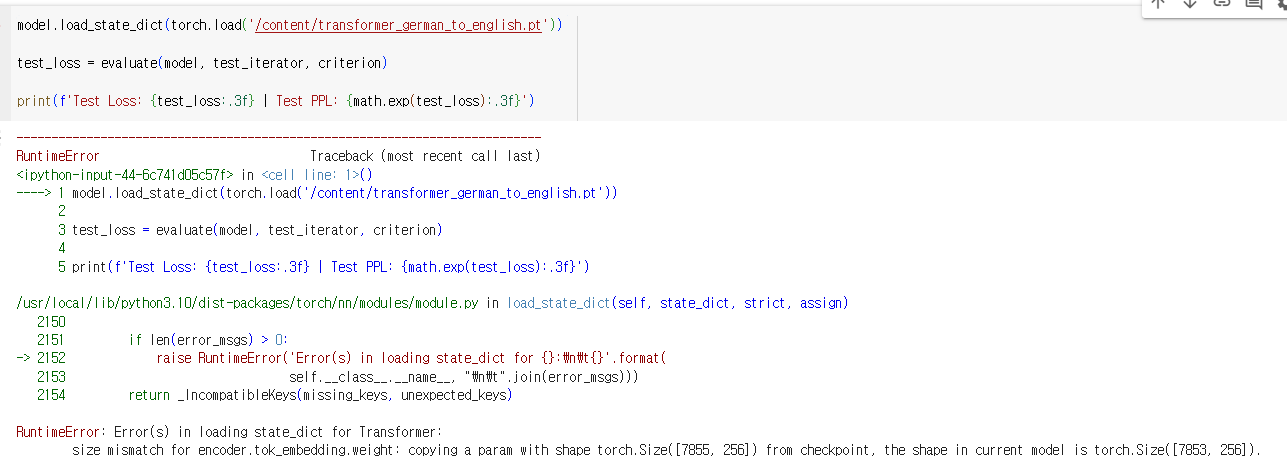
모델 테스트 결과 확인 때 계속 이런 에러가 나서 결과 확인을 하지 못했다. BLEU score도 좀 낮은 것 같은 느낌도 들고,, train, test, valid 모두 갯수가 제대로 나오긴 했지만 데이터 상 문제가 있는건지 잘못 불러온건지 모르겠다
혹시라도 저와 같은 에러 해결하신분 있으시면 자유롭게 댓글 부탁드립니다...
저거 해결하다가 시간 다 보낼것 같아서 attention is all you need 아키텍처 모델 구조와 이에대한 코드를 공부했다는것에 의의를 두겠습니다...